H.264 encoding guide
This article describes briefly what H.264 is and how to get H.264 encoding support for Avidemux. It also summarizes and explains the x264 options available in Avidemux. This can be considered a (simple) guide to the encoder.
Overview
H.264, which is also known as “MPEG-4 Part 10” or “MPEG-4 Advanced Video Coding” (AVC), is a digital video compression standard, which is noted for achieving very high data compression. While H.264 generally requires more CPU power for playback than video encoded with the older MPEG-4(nbsp)Part(nbsp)2 standard (as used by Xvid or DivX), the compression efficiency is much better! That means: With H.264/AVC you can get a significantly better quality at the same file size -or- you can get the same quality at a significantly smaller file size (compared to MPEG-4(nbsp)ASP). While H.264 compresses much more efficient than MPEG-4(nbsp)Part(nbsp)2, the advantage over MPEG-2 is even greater.
More detailed information about H.264 can be found in the corresponding Wikipedia article. A comparison of various H.264 encoders against MPEG-4 Part-2, MPEG-2 and other video formats can be found at http://mirror05.x264.nl/Dark/website/compare.html.
x264 introduction
While Avidemux uses “built-in” libavcodec from FFmpeg for H.264 decoding, it needs an additional (external) library for H.264 encoding. Therefore Avidemux uses x264. x264 is a free library for encoding H.264/AVC video streams. The code is written from scratch by Laurent Aimar, Loren Merritt, Eric Petit (OS X), Min Chen (VfW/asm), Justin Clay (VfW), Måns Rullgård, Radek Czyz, Christian Heine (asm), Alex Izvorski (asm), and Alex Wright. It is released under the terms of the GPL license. So to clarify, the encoder library is called x264 while the compression standard it uses is called H.264 (or MPEG-4 AVC). In other words: The x264 encoder software creates H.264/AVC video. It should be noted that x264 while being “free” software can compete with commercial H.264 encoders in terms of quality and speed. Major companies in the video business, such as Youtube and Facebook, are known to use the x264 encoder.
Get x264 for Avidemux
If x264 is not available in your version of Avidemux, there is a guide on how to download and compile x264 by yourself. It is in the Compiling x264 section.
After you compile x264, you will have to re-compile Avidemux to build in the x264 feature. There is also a guide on how to do this in the Compiling Avidemux section.
Note that if you are using the pre-compiled Avidemux builds for Microsoft Windows, the required x264 library ships with the installer. Hence no additional software is required! Stuff like “Codec Packs”, “VFW Codecs” or “DirectShow Filters” will not work with Avidemux! Anyway, the latest builds of the x264 library for Avidemux can be found in the libx264 GIT builds thread (make sure you navigate to the very last post!). These builds usually are newer – and less tested – than the ones that ships with Avidemux.
x264 options available in Avidemux
Avidemux contains most of the options available in the x264 library. For options not yet available, see the “Unavailable” section in this article.
General
Rate Control
Encoding Mode:
Single Pass - Constant Quantizer: This mode is also known as the “QP Mode”. It will encode your video to a constant quantizer, so you will choose the target quantizer, not the target bitrate. The quantizer is a measure for the amount of data loss: a higher quantizer means that more data will be lost, which results in a better compression (smaller file), but also delivers worse visual quality. In contrast a lower quantizer means that less data will be lost, which results in a better visual quality, but also compresses worse (larger file). H.264 uses a quantizer scale between 0 and 52. The default quantizer value is 26. If you are targeting for a certain level of quality and don't care much about the final file size, then you might consider using the QP mode. But if you are targeting for a certain file size (or a certain average bitrate), then keep away from QP Mode! That's because the final size (the average bitrate) is completely unpredictable in this mode.
Single Pass - Constant Rate Factor: This mode is also known as the “CRF Mode” or “Constant Quality” mode. It basically works similar to the QP Mode (see above), but it will encode with an average quantizer instead of a constant one. To be more precise, this mode encodes at a constant “rate factor”, which is derived from the specified quantizer. Internally CRF mode uses the same ratecontrol algorithm as x264's ABR mode, only without a target bitrate. The advantage of the CRF mode is that it suits the human perception much better than the QP mode. For example it will raise the quantizers in “fast” scenes where the loss won't be visible anyway and lower the quantizers in “slow” scenes. Therefore the CRF mode should give the same subjective quality as QP mode, but it usually achieves a significant higher compression. It's recommended to prefer CRF mode over QP mode, although CRF is a bit slower. When switching from QP to CRF mode, you may want to slightly lower the quantizer. This should give approximately the same file size as before, but better visual quality! Another important advantage of CRF mode is that it will benefit from adaptive quantization, something that QP mode can't do.
Please note: Even the CRF mode doesn't deliver “perfect” constant quality! A specific CRF value will only deliver similar quality for various sources, as long as you don't change any other settings. Using “slower” settings with the same CRF value will either produce a smaller file at same quality or a produce a file of the same size at a better quality. It's also possible that both, the size and the quality, will be increased. The “quality per size” ratio will be improved anyway.
Remarks: Choosing the proper quantizer setting for a CRF (or QP) encode is not trivial! That's because visual quality is highly subjective: What some people consider “good quality” other people will consider “horrible quality” - and vice versa. Furthermore the quantizer setting highly depends on contents of your video. Nevertheless a quantizer setting in the range between 16 and 32 should give satisfactory results in most cases. Using a quantizer lower than 16 usually is overkill, except for mastering purposes. Using a quantizer higher than 32 will result in almost unwatchable video. A quantizer of 22 seems to be reasonable for most purposes. Nevertheless material with few textures, like Anime and Cartoons, can cope with much higher quantizers. At the same time “real life” footage with a lot of textures might require much lower quantizers, especially in dark scenes. There also is a rule of thumb: Lowering the CRF value by 6 will double filesize, lowering CRF by 1 will raise filesize by ~12.5% (very roughly). Furthermore the common practice is as follows: Start with a low CRF value, such as 16. Then raise the CRF value in steps of one, until the quality becomes intolerable. This way you'll find the highest possible CRF value that still gives an accepted quality for your eyes. Once you found it, you can use that value for all your future encodes.
Single Pass - Bitrate: This mode will encode your video at an average bitrate with only one single pass. So this mode only requires half the time of a “Two Pass” encode. In contrast to CRF mode (and QP mode) the resulting average bitrate is known in advance. Therefore it's easy to predict the final file size. A higher bitrate will result in a better visual quality, but of course it will also result in a bigger file. A lower bitrate will results in a smaller file, but it will also result in a worse visual quality. Unfortunately the encoder doesn't “know” the content of the video in advance when encoding with only one pass. Hence the encoder's ability to adjust the bitrate with respect to the content of the video is extremely limited in this mode! Only “local” optimizations are possible. This results in a pretty bad video quality (compared to a “Two Pass” encode), especially at medium and lower bitrates! Therefore it's highly recommended to not use this mode, unless you really need to do it in one pass.
Two Pass - Average Bitrate: This mode will encode your video at an average bitrate and it will use two encoding passes. Consequently this mode requires twice the time of a “Single Pass” encode (roughly). In contrast to CRF mode (and QP mode) the resulting average bitrate is known in advance. Therefore it's easy to predict the final file size. A higher bitrate will result in a better visual quality, but of course it will also result in a bigger file. A lower bitrate will results in a smaller file, but it will also result in a worse visual quality. During the first pass the encoder will perform a detailed analysis of the video and create a so-called “stats” file. Then during the second pass the actual encoding takes place and the final file is created. The advantage of using two passes is that during the second pass the encoder can rely on the data collected during the first pass. This allows the encoder to distribute the available bits among the entire video. For example “high motion” scenes will get a significant higher bitrate than “static” scenes. This is done in order to keep the visual quality constant over the whole movie. Ugly “blocking” on fast/spontaneous movement (as seen in “Single Pass” encodes) is avoided. Therefore a “Two Pass” encode provides the maximum visual quality for the given target bitrate (file size). It's highly recommended to always use this mode, if you are targeting for a certain average bitrate!
Two Pass - File Size: This mode will actually use the “Two Pass - Average Bitrate” mode. The one and only difference is that Avidemux will
automatically calculate the required bitrate for you. This way a specific target file size can be hit easily. Just enter your desired file size (for example “700
MB” for a CD-R media or “4700
MB” for a DVD-R media) and that's it! All the rest works exactly as described for the “Two Pass - Average Bitrate” mode.
Please note: x264 will not take the audio bitrate and the container overhead into account. Hence the target size specified in the x264 dialog only effects the video part of the file. If your file contains at least one audio track, then the actual file will come out bigger than the specified size. Also the container adds some additional overhead to the file. So please use Avidemux' “Calculator” tool to set up the target file size properly!
Remarks: Choosing the proper target bitrate for a bitrate-based encode (“Two Pass” or “Single Pass” mode) is not trivial at all! That's because the bitrate required for satisfactory results highly depends on the “compressibility” of your video and also on your personal preferences. For example “clean” sources can get away with a significant smaller bitrate than noisy/grainy sources. Also animated footage usually can get away with much smaller bitrates than “real life” footage. Anyway, in most cases an average bitrate in the range between 500 kbps and 2500 kbps should give acceptable results for most SD material, like Video-DVD backups. Average bitrates above 2500 kbps are considered “overkill” for SD material. Of course exceptions exits! Also be aware that when dealing with HD material (720p or 1080p) significant higher bitrates will be required. Bitrates of 10 mbps and above aren't unusual for HD encodes. Note that pre-processing, such as denoising, can reduce the bitrate requirement of a source.
Lossless Mode: x264 also supports “true” lossless compression. Using this mode there will be absolutely no degradation to your video data. But lossless compression will take significant more bitrate than any lossy compression. So converting from a lossy format (e.g. MPEG-2 or MPEG-4 ASP) to lossless compression will produce a file much bigger than the source! Anyway, x264 in “lossless” mode will usually still need less bitrate than other lossless encoders, such as HuffYUV or FFV1. And it's much smaller than uncompressed video (e.g. raw YUV/RGB data), of course. In order to enforce lossless compression, you must choose the Constant Quantizer mode and you must set the quantizer to a value of 0. Note that playback of lossless H.264 requires a decoder capable of the “Predictive Lossless” profile. Decoders that support this include libavcodec/ffmpeg (ffdshow, MPlayer, etc.) and CoreAVC Decoder. Other decoders may display garbled output (or no output at all).
Macroblock-Tree Rate Control
The setting enables
Macroblock-Tree Rate Control (aka “
MB-Tree”). It tracks the propagation of information from future blocks to past blocks across motion vectors. It could be described as localizing qcomp (quantizer curve compression) to act on individual blocks instead of whole scenes. Thus instead of lowering quality in high-complexity scenes (like x264 does
without MB-Tree), it'll only lower quality on the complex part of the scene, while for example a static background will remain high-quality. It also has many other more subtle effects, some potentially negative, most probably not. This helps at all bitrates, but can even help at phenomenally low bitrates where the video would otherwise fall apart completely. Note that
MB-Tree now handles fades much better thanks to
Weight-P. Since
MB-Tree greatly improves the overall quality, it should
always be enabled. See the
x264 "Macroblock Tree Ratecontrol" testing thread for more information on how
MB-Tree works.
Multi-Threading
This setting controls how many threads x264 will use for encoding. Thanks to its multi-threading implementation, x264 is able to fully utilize the processing power of modern multi-core processors. This is achieved by encoding several frames in parallel (see
http://git.videolan.org/gitweb.cgi?p=x264.git;a=blob;f=doc/threads.txt for details). Tests have shown that x264 scales extremely well up to at least 16 cores. Anyway, to make optimal usage of your multi-core machine, the correct number of threads must be selected. The following options are available:
Disabled: Disables multi-threading. One single thread will be used. This makes no difference for single-core machines, but will significantly slow down x264 on multi-core machines.
Auto-Detect: Let x264 decide the optimal number of threads. The formula used is: threads = cpu_cores * 3/2. Tests have shown that this formula (usually) gives the optimal performance. It's highly recommended to keep this setting!
Custom: Manually overwrite the x264 auto detection. Only use this if you have a really good reason to mistrust x264's detection.
Remarks: Many people complain that the CPU load doesn't reach 100% in Taskmanager when encoding a video with x264, even with multi-threading enabled. This may have several reasons. Most likely something in the processing chain is bottlenecking x264. For example a single-threaded decoder and/or compute-intensive video filters may easily become the performance bottleneck. In that case x264 has to wait for the input and becomes idle. So in fact it's not a problem in x264 itself. Another “problem” is Intel's Hyperthreading technology, as used by the Pentium 4 and the Core i7 (Nehalem) processor. With Hyperthreading there are two virtual cores per physical core. Hence a CPU load of 50% indicates that all physical core are busy (which equals 100% load on a None-Hyperthreading CPU). Last but not least the efficiency of multi-threading shouldn't be measured with CPU load as displayed by Taskmanager. Instead the throughput (that is: the number of frames encoded per second) must be measured. So please keep in mind that high CPU load alone doesn't imply good performance!
Motion
Motion Estimation
ME Method: Video compression works by discarding redundant information between consecutive frames. For example P-Frames will be predicted from the previous frame(s). Then only the difference between the predicted frame and the original source frame is saved in the bitstream. That is called the “residual”. The more accurate a frame is predicted, the less data needs to be stored. Because objects tend to move between neighboring frames, detecting and compensating motion is essential for an accurate prediction! The ME Method determines which algorithm is used to search for motion and to calculate the so-called “motion vectors”. Using a more accurate search method will result in a better visual quality, but will also take more time for encoding. Using a faster method will speedup the encoding process, but will also result in a worse visual quality. Since the ME Method has a huge impact on encoding speed and on the visual quality of your video, you should decide carefully! It's highly recommended to not go below the default setting. You should consider an even slower mode, if quality is more important than encoding time. The following methods are available:
Diamond Search (DIA): Four sided shape analysis - This is the fastest method, but it also provides the worst quality. Use this for method only if encoding speed is more important than quality.
Hexagonal Search (HEX): Six sided shape analysis - The is the default method. It provides reasonable quality and still works pretty fast.
Uneven Multi-Hexagon Search (UMH): More detailed version of Hexagonal search - This method provides high quality, but works slower than the simple “HEX” method. If you prefer quality over speed, then use this method.
Exhaustive Search (ESA): Complete and extensive analysis - This brute-force method works very slow, but the resulting quality usually is only slightly better compared to the “UMH” method (if at all).
Hadamard Exhaustive Search (TESA): Improved version of “ESA” method using Hadamard transform - This method runs even slower than the “ESA” method. Use this method, if you have got a lot of time to waste.
Remarks: Tests have shown that the “Exhaustive Search” is significant slower than “Uneven Multi-Hexagon Search”, but it doesn't necessarily produce a better perceived quality. Furthermore “Hadamard Exhaustive Search” will take at least twice as long as “Uneven Multi-Hexagon Search”. Therefore using a method slower than “Uneven Multi-Hexagon Search” generally isn't worth the extra encoding time.
Subpixel Refinement: This setting (also known as “Sub ME”) controls the precision of the motion estimation process. The higher the precision, the better the results. Therefore you should always use the highest mode that you can afford. Of course higher precision takes more time for encoding. Note that regardless of the setting, QPel motion estimation is always used. RDO is equal to using the VHQ setting of the Xvid encoder. It's highly recommended to not go below the default value of 6, because Psy-RDO requires at least Sube ME 6. If you have the time, then you should consider using an even higher value. In case visual quality is more important than encoding time, you should even go with the maximum! Mode 9 (or even 10) gives the best quality. If you prefer speed over quality, use mode 2. You should never go below mode 2, even for “fast and dirty” encodes.The following Sub-ME modes are currently available:
QPel SAD (Fastest, worst quality)
QPel SATD
-
Always QPel
QPel & bidirectional ME
RD on I- and P-Frames (Default, lowest mode that supports Psy-RDO)
RD on all frames
RD refinement on I- and P-Frames
RD refinement on all frames
RD refinement on all frames + QPRD (Slowest, best quality)
Motion Vector
Range: This setting defines how many pixels are analyzed for motion estimation. Higher range values result in a more accurate analysis, but will also slow down the encoding speed significantly. Lower values will speed-up the encoding process, but will also result in a less accurate analysis. Note that high resolution material generally benefits more from higher range settings than low resolution martial. That's because objects tend to move farther (with respect to pixels) in HD video. Anyway, the default value of 16 is sufficient for most videos! The “Diamond Search” and “Hexagonal Search” methods are even limited to maximum range of 16. If quality is more important than encoding speed and if you are using the “Uneven Multi-Hexagon Search” method (or an even slower method), you may want to raise range to a value of 24 or even 32. Depending on the selected ME method, the range value may be rounded up to a multiple of two or four.
Maximum Motion Vector Length: This setting can be used to limited the maximum length of each motion vector. By default x264 will limit the maximum motion vector length based on the detected level. You can use this option to overwrite x264's decision. It's highly recommended to not use this option, unless you have a very good reason to do so!
Minimum Buffer Between Threads: x264 uses a frame-based multi-threading method. To allow encoding of multiple frames in parallel, x264 has to ensure that any given macroblock uses motion vectors only from pieces of the reference frames that have been encoded already. This is usually not noticeable, but can matter for very fast upward motion. By default x264 will decide the minimum space between threads based on the number of threads. You can use this option to overwrite x264's decision. It's highly recommended to not use this option, unless you have a very good reason to do so!
Prediction
Weighted Prediction for B-Frames: This feature allows the encoder to produce more accurate B-Frames by “weighting” the reference frames in a none-symmetric way. This comes at the cost of some encoding speed. Since weighted B-Frames will generally improve the visual quality, it's recommended to always keep this setting enabled, except encoding speed is more important than quality.
Weighted Prediction for B-Frames: This feature allows the encoder to produce more accurate B-Frames by “weighting” the reference frames in a none-symmetric way. This comes at the cost of some encoding speed. Since weighted B-Frames will generally improve the visual quality, it's recommended to always keep this setting enabled, except encoding speed is more important than quality.
Partition
Partition Search
8×8 Adaptive DCT Transform: This settings enabled the adaptive 8×8 DCT transform. This will significantly improve the visual quality at a minor speed cost. In fact this option is known to give the bests speed/quality trade-off of all options. Unfortunately it requires a “High Profile” capable H.264 decoder. It's highly recommended to keep this option enabled, if possible!
8×8, 8×16 and 16×8 P-Frame Search: This settings enables the 8×8 partitions on P-Frames and thus improves the visual quality of these frames. It's recommended to keep this option enabled!
8×8, 8×16 and 16×8 B-Frame Search: This settings enables the 8×8 partitions on B-Frames and thus improves the visual quality of these frames. It's recommended to keep this option enabled!
4×4, 4×8 and 8×4 P-Frame Search: This settings enables the 4×4 partitions on P-Frames, but usually the quality improvement will be negligible. Therefore this option is not worth the additional encoding time and thus can safely be turned off.
8×8 I-Frame Search: This settings enables the 8×8 partitions on I-Frames and thus improves the visual quality of these frames, but it requires 8×8 Adaptive DCT Transform. It's recommended to keep this option enabled, if possible!
4×4 I-Frame Search: This settings enables the 4×4 partitions on I-Frames and thus improves the visual quality of these frames. It's recommended to keep this option enabled!
Remarks: During the encoding process, the encoder will break down the video into so-called “Macroblocks”. Then it will search for similar blocks in order to discard redundant data (see Motion Estimation). The macroblocks can be subdivided into 16×8, 8×16, 8×8, 4×8, 8×4, and 4×4 partitions. Analysing more of these partitions results in a more accurate prediction and thus improves the visual quality. Unfortunately this comes at the cost of additional encoding time. Generally it's recommended to keep all partition types enabled, except the for the “4×4 P-Frame” partitions. That's because the 4×4/4×8/8×4 partition search on P-Frames costs a significant amount of encoding time, but the gain in quality usually is negligible (only low resolution video may benefit). Note that some of the partition options depend on each other! Furthermore you have to take into account that 8×8 Adaptive DCT Transform (and consequently 8×8 I-Frame Search) are “High Profile” features and will require a suitable H.264 decoder, such as MPlayer, ffdshow or CoreAVC. Nevertheless 8×8 Adaptive DCT Transform and 8×8 I-Frame Search are extremely useful features.
Frame
Frame Encoding
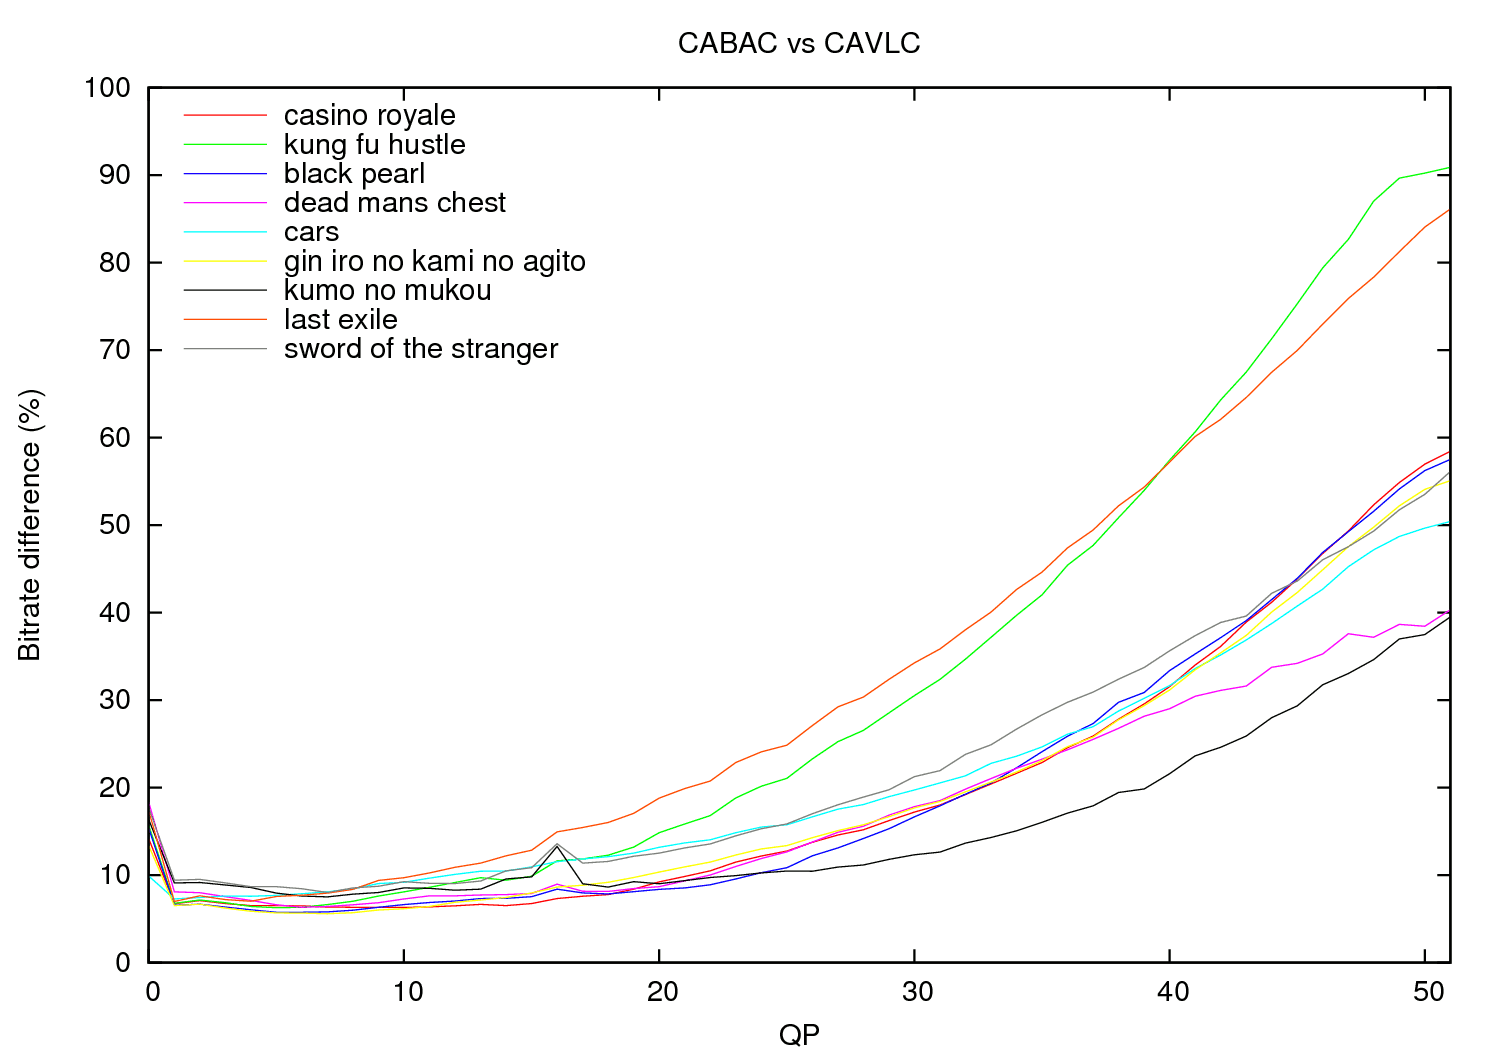
CABAC: This setting enables CABAC entropy encoding, one of x264' most impressive features. CABAC (Context Adaptive Binary Arithmetic Coding) works absolutely
lossless, but gives an extra compression boost of ~15%. At higher quantizers CABAC can save even more bitrate - up to 50% and more is possible (see
http://akuvian.org/src/x264/entropy.png). Consequently with CABAC enable you will either get a smaller file at same quality (
CRF and
QP mode) or better quality at the same file size (2-Pass mode). Therefore it's highly recommended to keep CABAC
enabled in all cases! Nevertheless CABAC requires additional CPU time for both, encoding and decoding! The extra CPU time required for CABAC highly depends on the bitrate. Note that CABAC can easily become the most compute-intensive part of H.264 decoding! If you decide to
disable CABAC (which you usually should
not do), then the less efficient but faster CAVLC (Context Adaptive Variable Length Coding) will be used.
Pure Interlaced Mode: This settings enables interlaced encoding, so enable this setting
only if you video is
interlaced. In case your video is
progressive (that is: non-interlaced) or if you don't know what “interlaced” means, keep away from this setting! Be aware that encoding an
interlaced video as
progressive will destroy the content! At the same time encoding a
progressive as
interlace is feasible, but significantly hurts encoding efficiency! Last but not least note that x264's implementation of
interlaced encoding is not as efficient as it could be. Hence if you are dealing with an
interlaced source, you are far better off using a
deinterlace filter and encode the video as
progressive.
Remarks: Now that CRT screens are dying out and LCD/Plasma screens are dominating the world,
interlaced content needs to be deinterlaced at playback-time anyway. Unfortunately some screens use pretty poor deinterlaces, resulting in a jittery/unsharp image. Therefore the preferred way is to deinterlace
before encoding the video, using a high quality deinterlacer/bobber, such as
Yadif or
TDeint.
Loop Filter: This setting controls one of x264' most important features: the Inloop Deblocking filter. In contrast to MPEG-4 ASP (DivX, Xvid, etc.) the Inloop Deblocking is a mandatory feature of the H.264 standard. So the encoder, x264 in this case, can rely on the decoder to perform a proper deblocking. Furthermore all P- and B-Frames in H.264 streams refer to the deblocked frames instead of the unprocessed ones, which improves the compressibility. There is absolutely no reason the completely disable the Inloop Deblocking, so it's highly recommended to keep it enabled in all cases. There are two settings available to configure the Inloop Deblocking filter:
Strength: This setting is also called “Alpha Deblocking”. It controls how much the Deblocking filter will smooth the video, so it has an important effect on the overall sharpness of your video. The default value is 0 and should be enough to smooth out all the blocks from your video, especially in Quantizer Modes (QP or CRF). Negative values will give a more sharp video, but they will also increases the danger of visible block artifacts! In contrast positive values will result in a smoother video, but they will also remove more details.
Threshold: This setting is also called “Beta Deblocking” and it's more difficult to handle than Alpha Deblocking. It controls the threshold for block detection. The default value is 0 and should be enough to detect all blocks in your video. Negative values will “save” more details, but more blocks might slip through (especially in flat areas). In contrast positive values will remove more details and catch more blocks.
Remarks: Generally there is no need to change the default setting of 0:0 for Strength:Threshold, as it gives very good results for a wide range of videos. Nevertheless you can try out different settings to find the optimal settings for your eyes. If you like a more sharp video and don't mind a few blocks here and there, then you might be happy with -2:-1. This might also be worth a try for MPEG-4 ASP (DivX, Xvid, etc.) users! If you like a smooth and clean image or encode a lot of Anime stuff, then you can try something like 1:2. Nevertheless you should not leave the range between -3 and +2 for both settings!
Max. Ref. frames: In contrast to MPEG-4 ASP, H.264 allows multiple reference frames. This setting controls how many frames can be referenced by P- and B-Frames. Higher values will usually result in a more efficient compression, which means better visual quality at same file size. Unfortunately more reference frames will require more time for encoding (and also a tiny bit more CPU power for playback). By default the number of reference frames is limited to 1. It's highly recommended to raise the number of references to at least 3. Nevertheless using more than 4 or 5 reference frames for “real life” footage should be avoided, as it won't improve the results any further! At the same time Anime and cartoons benefit a lot from additional reference frames. Sometimes even the maximum of 16 reference frames can be helpful for such material.
Remarks: While “software” players usually support any number of reference frames, “hardware” players are limited to a maximum number of reference frames! The maximum number of reference frames can be calculated from the “Max Decoded Picture Buffer Size” (MaxDPB) and the resolution of the video. The MaxDPB value is defined by the individual H.264 Profile supported by the player (for details see Annex A of the H.264 specs).
B-Frames
Max Consecutive: This setting controls the maximum number of consecutive B-Frames. B-Frames refer to both, the previous and the following I-Frame (or P-Frame). This way B-Frames can compress even more efficient than P-Frames. B-Frames can significantly improve the visual quality of the video at the same file size. Therefore using B-Frames is highly recommended. Also note that allowing more B-Frames will never hurt the quality: You can even safely choose the maximum of 16 consecutive B-Frames. That's because you only specify the upper bound for the number of consecutive B-Frames. x264 will still decide how many consecutive B-Frames are actually used. So even if you allow up to 16 consecutive B-Frames, the encoder will rarely go that high. Nevertheless limiting the maximum number of B-Frames to less than 16 is reasonable, because most videos won't benefit from using more than ~4 consecutive B-Frames anyway! Raising the B-Frame limit higher than that would only slowdown the encoding process for no real benefit! If you set the B-Frame limit to 0 (the default), B-Frames will be disabled. Of course disabling B-Frames is not recommended!
B-Frame Bias: This setting controls the probability that a B-Frame is used instead of a P-Frame. The default value is 0, which also is the recommended setting. A positive value increases the probability that a B-Frame is set. In contrast a negative value decreases the probability that a B-Frame is set. Of course the encoder will never violate the Max Consecutive limit, no matter what Bias setting is used.
B-Frames as reference: This feature is often called “B-Pyramid”. If you enable this settings, B-Frames are allowed to make references non-linearly in order to improve bitrate usage and quality. This way B-Frames can refer to B-Frames. Usually it's recommended to keep this feature enabled as it should improve the result. Nevertheless you have to take into account that this is a “High Profile” feature and thus requires a suitable decoder, like libavcodec (MPlayer, ffdshow, etc.) or CoreAVC. The following modes are available:
Strict: Strictly hierarchical B-Pyramid. This mode is fully BluRay compatible.
Non-Strict: Normal B-Pyramid mode. Gives better results than the “strict” mode, but it's not BluRay compatible (as BluRay has weird specs).
Disabled: Don't use B-Frames as references. Not recommended.
I-Frames
Minimum GOP Size: This setting controls the minimum number of frames between two IDR frames. IDR frames are similar to Keyframes in MPEG-4 ASP videos: Playback can only be started at an IDR frame, as no frame after the IDR frame will refer to a frame before the IDR frame. In H.264 this is not possible with “normal” I-Frames, because of the multiple references. So IDR frames are needed to allow seeking in the video. Nevertheless too many IDR frames would cause an inefficient encoding, so there's a minimum interval for IDR frames. As a rule of thumb, this value should equal the framerate of the video. For example a 25 fps video should use a value of 25, a 29.97 fps video should use a value of 30 and so on.
Maximum GOP Size: In contrast to “Min IDR frame interval” this setting controls the maximum number of frames between two IDR frames. A higher value will result in a larger IDR frame interval and thus slowdown seeking; a lower value will result in a shorter IDR frame interval and thus improve seeking. As a rule of thumb, the IDR frame interval shouldn't be lower than the framerate of the video multiplied with a factor of 10. For example a 25 fps video should use at least a value of 250, a 29.97 fps video should use at least a value of 300 and so on. Using even higher values will improve the compression at the cost of some seeking performance. Of course martial with many “long takes” and long “tracking shots” will benefit much more from long GOP's than martial which mainly consists of very short scenes. Please note that long GOP's will hurt error resilience, which may be a problem for steaming media (and also for Blu-Ray authoring)
Scene Cut Threshold: This setting controls the threshold for x264' scene change detection. This way the encoder can put an I-Frame at every scene change (instead of an P- or B-Frame), which should lead to better looking scene cuts. A lower threshold results in a more aggressive scene change detection, which might be useful for very dark videos. In contrast a higher threshold will detect less scene changes. The default is 40 and should be suitable for most videos.
Analysis
Analysis Configuration
Mixed Refs: If this setting is enabled, each 16×16 macro block can choose it's own (optimal) reference frame. This will slow down the encoding process, but it allows a more efficient compression. Especially if you use a high number of reference frames, this setting will give you great improvement and is worth the additional encoding time. If you use few reference frames, Mixed Refs will be less effective. You should keep this setting enabled, if visual quality is more important than encoding speed.
Chroma ME (Motion Estimate): If this setting is enabled, then the color information (chroma) will be taken into account for motion detection, otherwise it will not. With “Chroma ME” enabled the motion detection will be slower but more accurate. So it will usually produce a higher visual quality at the cost of some encoding time. Therefore it's recommended to always keep this setting enabled, except encoding speed is more important than visual quality.
Trellis Quantization: This setting enables the Trellis RD quantization. Basically Trellis will perform an additional quantization step: It will keep certain “details” that would have been removed otherwise. At the same time it will remove certain “details” that would have been kept otherwise. Usually Trellis will improve the overall quality in a noticeable way, but it causes a significant slowdown of the encoding process. Before the Psy optimizations were added to x264, Trellis 2 was said to have a tendency to remove fine details and improve edges. Therefore Trellis 1 often was considered the better choice. But now when using Psy RDO, it's highly recommended to use Trellis 2, although it's significant slower than Trellis 1. If speed is more important than quality, set Trellis to 0 in order to disable it. Note that Psy-Trellis requires Trellis quantization, so Psy-Trellis will be disabled when Trellis is set to 0. Also note that Trellis requires CABAC. The following modes are available:
2: Always On (Slow, best quality)
1: Final Makroblock only (Faster, medium quality)
0: Disabled (Fastest, worst quality)
Fast P-Skip: If this setting is checked, then “Fast P-Skip” will be used. Fast P-Skip is an optimization that will speedup the encoding process at the cost of some visual quality. Nevertheless the quality loss caused by Fast P-Skip usually is negligible while the speedup is distinct. Therefore it's recommended to keep Fast P-Skip checked. Unfortunately in rare cases Fast P-Skip causes artifacts in “flat” scenes, so you might want to uncheck Fast P-Skip in case visual quality is more important than encoding speed.
DCT Decimate: If this setting is checked, then DCT Decimation will be used. This feature allows x264 to discard “unnecessary” DCT blocks. Those DCT blocks won't be written to the bitstream, which saves some bitrate and improves encoding efficiency. Of course there will be a subtle loss in quality, but usually the effect is negligible. Since DCT Decimation leads to significant smaller files in Quantizer-based modes (QP or CRF) it's recommended to keep this setting enabled. You should not disable the DCT Decimation, unless you have a very good reason to do so. Rumors say that DCT Decimation shouldn't be use together with Trellis quantization, but this has been refuted!
Noise Reduction: This setting controls x264' internal denoise filter. Please note that denoising is
not part of the H.264 specifications! So this has be considered an additional
pre-prcoessing feature. The default value is
0, which will completely turn
off the denoise filter in x264. There is no need to change this setting, except you explicitly want to apply additional denoising to your video
before encoding. Usually good values for noise reduction are
no higher than
1000. Nevertheless you will usually be better off with a good “stand-alone” denoise filter like
FluxSmooth or
MPlayer's denoise3d. If you use one of those, please make sure x264' noise reduction is
off!
Psycho-visually optimized RDO & Trellis
The human eye doesn't just want the image to look similar to the original, it wants the image to have similar complexity. Therefore, we would rather see a somewhat distorted but still detailed block than a non-distorted but completely blurred block. The result is a bias towards a detailed and/or grainy output image, a bit like xvid except that its actual detail rather than ugly blocking (see http://x264dev.multimedia.cx/?p=164 and http://forum.doom9.org/showpost.php?p=1144270&postcount=1 for more info). The purpose of Psy RDO is to keep the complexity of an encoded block similar to the complexity of the original block. This way Psy RDO produces an image that looks much sharper and more detailed in many cases (compared to none Psy RDO). It also helps to preserve film grain greatly! Please note that Psy RDO will inherently hurt metrics, such as PSNR and SSIM. As soon as psycho-visual optimizations are involved, the classical metrics become useless! Also note that Psy RDO will work with RDO modes only: If Partition Decision is set to 6 (or higher), then Psy RDO will be on by default, otherwise it will be disabled. In addition to Psy RDO there also is Psy-Trellis now. This is still considered an “experimental” feature and disable by default, but it seems to help greatly for retaining textures in the video. Note that Psy Trellis is based on Trellis quantization. Consequently it will only be effective with Trellis quantization enabled too (Trellis 1 is sufficient now, but 2 will be more effective).
Psy RDO Strength: This setting controls the strength of Psy RDO. Note that the latest Psy RDO patch will automatically scale the strength of Psy RDO, based on the quantizer of the frame! Therefore the “strength” stetting is simply an additional factor, which will be multiplied to the internal scaling factor. The default value for Psy RDO Strength is 1.0, which should be sufficient for “Film” material. Using even higher values may introduce artifacts! Furthermore it is recommended to lower Psy-RDO to a value of 0.4 for “Animation” material. This does not mean that Psy-RDO is generally harmful for “Animation” material, you just needs to lower the strength for such material.
Psy Trellis Strength: This setting controls the strength of Psy Trellis. The default value is 0.0 currently, so Psy Trellis will be disabled by default. Anyway, it may be beneficial to use Psy Trellis for encoding “Film” material. But be careful! Tests have shown that a value of 1.0 usually is too strong for Psy Trellis. For most sources a value of 0.15 should be sufficient. Even higher values may introduce artifacts! Also using Psy-Trellis for “Animation” footage is not recommended.
Luma Quantization Deadzones
Quantization Matrix
JVT Matrix: This is the alternative quantization matrix of the H.264 specifications. Tests have shown that the “JVT Matrix” performs poorly, although it's part of the official specifications. Therefore it's highly recommended to not use this matrix, except for testing and comparison! You will be far better off with the “Flat Matrix” in almost any case.
Custom Matrix: This setting allows you to load your
own quantization matrices. Creating quantization matrices as a complex task an needs a
deep understand of how video compression works in detail. So creating new quantization matrices should be reserved to the H.264 gurus. Nevertheless you can find a list of suitable matrices at
this and
this location. Please note that your “Deblocking Filter” settings have a huge impact on how good/bad a certain quantization matrix performs! Also most custom matrices are targeting a certain bitrate range (e.g. ultra high or ultra low bitrates) and will perform
bad outside this range. Last but not least you should
not use any custom matrices, except you know what you are doing. In most cases you will get satisfactory results simply by sticking with the “Flat Matrix” (default).
Remarks: Now that x264 contains various psycho-visual optimizations (Adaptive Quantization, Psy-RDO, Psy-Trellis) custom quantization matrices have become obsolete! Most of the things that people tried to achieve with custom matrices, such as detail and grain retention, can now be achieved by Psy optimizations in a more sophisticated way. Furthermore the Psy optimizations are tuned for the default flat matrix. So using “extreme” custom matrices may result in undesired effects when Psy optimizations are involved! Therefore we highly recommend to stick with the “flat” matrix, unless you have a very good reason to use a custom matrix.
Quantizer
Quantizer Control
Minimum Quantizer: Specifies the minimum quantizer to be enforced. This means every frame will get at least this amount of data loss. The default value is 10, which makes sure no bitrate is wasted on too low quantizers. This value should be okay, even for high quality videos.
Maximum Quantizer: Specifies the maximum quantizer to be allowed. This means none of the Frames will get a higher amount of data loss than this. The default value is 51, which is the maximum quantizer possible. So “Max Qp” is not limited by default. Of course the encoder will only go that high when it's really necessary, so don't worry!
Maximum Quantizer Step: Specifies how much the quantizer can change between two consecutive frames. The default value is 4. This makes sure that two consecutive frames won't get too different quantizers. If you allow significant greater QP Steps, this might result in visible quality “jumps” between frames, so don't do that.
Average Bitrate Tollerance: This setting effects the “Single Pass” bitrate-based mode only. It controls how precise the encoder will hit the target bitrate (or target file size). The goal of “Bitrate Variance” is to get as close as possible to the quality of an CRF mode encode, while still being somewhere near the target file size. A value of 0.0 would restrict the encoder to exactly hit the desired bitrate. The default value of 1.0 allows an discrepancy of 1%, which is still pretty restrictive but already a lot better than pure CBR. Please note that the discrepancy usually should be within a range of 30%. Furthermore CRF mode still gives much better results than the bitrate-based mode and therefore is the recommended method!
Factor between I- and P-Frame Quants: This setting controls how much stronger P-Frames will be compressed compared to I-Frames. A value of 1.0 would assign the same quantizers to P-Frames and I-Frames, while the default value of 1.4 assigns 40% higher quantizers to P-Frames (compared to I-Frames). This equals the “I-Frame Boost” option of Xvid. Compressing P-Frames stronger than I-Frames is recommended, as I-Frames serve as the initial reference of a scene and thus have a huge impact on the quality of the following frames. Therefore you should not change the default value, unless you have a very good reason to do so!
Factor between P- and B-Frame Quants: This setting controls how much stronger B-Frames will be compressed compared to P-Frames. A value of 1.0 would assign the same quantizers to B-Frames and P-Frames, while the default value of 1.3 assigns a 30% higher quantizer the B-Frames (compared to P-Frames). Compressing B-Frames stronger than P-Frames is recommended, as B-Frames are not referenced by other frames (except for the B-Pyramid), while P-Frames server as reference for the following frames. Therefore you should not change the default value, unless you have a very good reason to do so!
Chroma to Luma Quantizer Offset: This setting controls how much stronger the color information (chroma) will be compressed compared to the brightness information (luma). Sometimes it's makes sens to compress the color information stronger than the brightness information, as data loss in the color information is less visible to the human eye than data loss in the brightness information. The specified offset will be added to the chroma quantizers. It can be configured between -12 and +12. The default value is 0 and usually it's recommended to keep the default value! Note that both, Psy-RDO and Psy-Trellis, will lower the offset by one or by two, if enabled. So you may end up with an offset of -4 by using Psy optimizations.
Quantizer Curve Compression
Quantizer Curve Compression (%): This setting is also called “qcomp” or “bitrate variability” (not to be confused with bitrate variance). It controls how much the bitrate can fluctuate over the entire video. Setting this to 0% would enforce a constant bitrate stream, while a value of 100% would result in a constant quantizer stream. The default value is 60%, which gives good results for most videos. So do not change the default, unless you have a very good reason to do so! Note that adaptive quantization (AQ) partially replaces the effect of qcomp and x264 will internally raise qcomp to compensate based on the adaptive quantization strength. Also note that using CRF mode together with a qcomp of 100% is technically equivalent to QP mode, except that CRF mode still is able to use AQ (which QP mode can't do). Hence the more you raise qcomp, the closer CRF mode gets to a QP encode.
Reduce Fluctuation Before Curve Compression: This setting will apply a temporal Gaussian blur to the quantizer curve before the “Quantizer Compression” step. This is done in order to flatten unwanted quantizer fluctuations, which should make the visual quality more stable, especially in Anime content. The default value is 20.0 and usually doesn't need to be changed.
Remarks: Further information on how x264' rate control works in detail can be found at
this location.
Adaptive Quantization
Adaptive Quantization (AQ) allows each macroblock within the frame to choose a different quantizer, instead of assigning the same quantizer to all blocks within the frame. The purpose of AQ is moving more bits into “flat” macroblocks. This is done by adaptively lowering the quantizers of certain blocks (and raising the quantizers of other blocks). Without AQ, flat and dark areas of the image tend to show ugly blocking or banding. Thanks to the new AQ algorithm, blocking and banding can be greatly reduced! With AQ enabled, you can expect a significant(!) gain in overall image quality. Especially in dark scenes and scenes with “flat” backgrounds (sky, grass, walls, etc.) much more details can be preserved. Nevertheless AQ seems to perform less efficient with “Animation” material than it does with “Film” material, but still helps to prevent banding. Note that AQ can be used with the bitrate-base modes (Single-Pass and Two-Pass) as well as with the CRF mode. It can not be used with the QP mode! That's because QP mode uses constant quantizers per definition, which is one of the reasons why QP mode generally should be avoided nowadays.
AQ Strength: This setting controls the amount of AQ that is applied to the frames. The default AQ Strength is 1.0 now, so AQ will be enabled by default. The default value should be well-balanced and give good AQ results for most sources. If you think your video requires stronger AQ, then you can raise the AQ Strength. A value of 1.5 is considered “strong” AQ. If you think the AQ effect is too strong, you can lower the AQ Strength. A value of 0.5 is considered “low” AQ. While sticking with an AQ value of 1.0 is recommended for “Film” material, it should be lowed to 0.6 for “Anmiation” material.
Advanced
Video Buffer Verifier
VBV (Video Buffering Verifier) defines a specific buffering model. In that model the decoder (player) reads the input data from a buffer. That buffer has a limited size. Also the buffer is filled at a limited data rate. VBV makes sure that the buffer will never run out of data, i.e. it makes sure that there is always enough data left in the buffer to decode the next frame. Therefore VBV forces additional bitrate and buffering constraints on the encoder. It's highly recommended to not use VBV, unless you can't get around it. VBV may hurt the video quality, but it never will improve the quality! Unfortunately hardware players (including mobile devices) may need VBV for proper playback. You will have to look up the particular VBV requirements for each device individually. In particular BluRay has strict VBV requirements. Note that x264's VBV implementation now works just fine with both, 1-Pass and 2-Pass modes. There's no need to use 2-Pass mode for VBV anymore. (See http://en.wikipedia.org/wiki/Video_buffering_verifier for details about VBV)
Maximum VBV Bitrate: Specifies the maximum bitrate (in kbit/s) at which data enters the buffer. This equals the bandwidth of the network (for streaming media) or the maximum disc read speed (for local playback). Note that this setting does not restrict the maximum (local) video bitrate. The (local) video bitrate is allowed to exceed the maximum VBV bitrate as long as there's enough data left in the buffer. A value of 0 indicates that VBV is not used (Default).
Maximum Buffer Size: Specifies the buffer size of the device/player (in kilobit). This is the maximum amount of data that can be hold inside the buffer. Usually this is pre-defined by the individual device/player you are encoding for. A value of 0 indicates that VBV is not used (Default).
Initial VBV Buffer Occupancy: Specifies the filling level of the device buffer at the start of playback. 90% is the default.
Note: VBV cannot be used without specifying both, the Maximum VBV Bitrate and the VBV Buffer Size. Specifying only one of them (while the other one is 0) does nothing!
Slicing
H.264 allows to segment each frame into several parts. These parts are called “slices”. The advantage of using multiple slices (per frame) is that the slices can be processed independently and in parallel. This allows easy multi-threading implementations in H.264 encoders and decoders. Unfortunately using multiple slices hurts compression efficiency! The more slices are used the worse! Therefore you should not use slices, if you don't have to. But if your H.264 decoder uses slice-based multi-threading (i.e. multiple slices are decoded in parallel), then multi-threading will only be used, if the video was encoded with multiple slices. Fortunately most software decoders do not require slices, because they use frame-based multi-threading (i.e. multiple frames are decoded in parallel). Hardware decoders may require slices though. In particular the Blu-ray specs say that at least 4 slices must be used.
Maximum Size per Slice: Specifies the maximum size per slice (in byte). x264 will use as many slices as required to comply with that restriction. A value if 0 means that multiple-slices are not used.
Maximum Size per Slice: Specifies the maximum number of macroblocks per slice. x264 will use as many slices as required to comply with that restriction. A value if 0 means that multiple-slices are not used.
Slices per Frame: Specifies the number of slices per frame. A value if 0 means that multiple-slices are not used.
Note: x264 does not require multiple slices to take advantage of multiple processor cores. Since r607 x264 uses frame-based multi-threading.
Zones
Zones can be used to manually assign a lower or higher bitrate to a certain section of the video (e.g. enforce a lower bitrate for the ending credits). There are two modes to control the bitrate of a zone: Using a “Bitrate Factor” you can change the bitrate relative to the encoders decision and using a “Quantizer” you can overwrite the encoders decision with a constant quantizer value.
Output
Output Settings
IDC Level:
By default x264 will detect the
Level of the resulting H.264 stream based on the encoder settings you have chosen (and based on the properties of your video).
This option can be used to overwrite x264 decision. Be aware that x264 will
not enforce the selected Level for you! You only specify what Level will be signaled in the header of your H.264 stream. But this does
not mean that your stream actually complies to that level! Hence you can easily produce an
invalid stream by specifying an improper level. Therefore it's
highly commended to keep the
IDC Level setting on
Auto and let x264 detect the proper Level. If you want your H.264 stream to comply to a specific H.264 Level, then you
must choose your encoder settings accordingly. Also you must make sure that your video's resolution and framerate don't exceed the Level's limits. In short: Don't change
this option, unless you have a very good reason to do so!
Sequence Parameter Set Identifier:
[TO-DO] If you know what information to put here, please contact us!
Pixel Aspect Ratio
This setting defines the “Pixel Aspect Ratio” (PAR) of the video. Do not change the default value of 1:1 (aka “Square Pixels”), unless you are encoding anamorphic video! In case you are encoding anamorphic material and you want to keep it anamorphic, then you will have to set the correct PAR value. Otherwise your video would be displayed with wrong aspect ratio! If you have an anamorphic source and you want to convert it to “Square Pixels” (PAR = 1:1), then you must invoke the Resize filter and resize the video accordingly. Note that “Pixel Aspect Ratio” is not equal to “Display Aspect Ratio” (DAR). Anyway, the DAR can be calculated from the PAR using this formula: DAR = Width/Height * PAR. For example: 720/576 * 64/45 = 16/9. The advantage of working with PAR values is that the PAR of a video won't change when cropping the video, while the DAR most likely will change. The following PAR options are available:
Custom: Enter a user-defined PAR value
Predefined Aspect Ratio: Choose one of the most common PAR values from the list
As Input: Keep the PAR of the source video
These settings are only suggestions for the playback equipment. Use them at your own risk!
Overscan
Video Format
Color Primaries
Transfer Characteristics
Color Matrix
Chroma Sample Location
Full Range Samples
Unavailable x264 options in Avidemux
AQ Mode - currently Avidemux sticks with AQ mode 1, mode 2 isn't available yet.
Sub-ME 10 - currently the highest Sub-Me mode available in Avidemux is 9, mode 10 (aka “QPRD”) is not available yet.
Psy-Trellis - currently Psy-Trellis will be disabled in Avidemux (Psy-RDO is available though!)
Progressive Intra Refresh
-
Obsolete x264 options
B-RDO: RD based mode decision for B-Frames. This option has been removed in r996. It's now enabled implicitly at Sub ME 7 or higher.
Pre-Scenecut: Since r1117 x264 will always use Pre-Scenecut, because it's generally better than regular scenecut in terms of accuracy and regular scenecut didn't work in threaded mode anyways.
Bidirectional ME: Jointly optimize both motion vectors in B-Frames. This option has been removed in r996. It's now enabled implicitly at Sub ME 5 or higher.
AQ Sensitivity: This option never existed in official x264. It was used only in experimental Adaptive Quantization patches. Current AQ doesn't use it.
H.264/AVC Profiles and Levels
The H.264/AVC specifications define a number of different profiles. Each profile specifies which features of H.264 are allowed (or not allowed). If you want your H.264 video stream to be compliant to a certain profile, then you may only enabled features allowed in this profile. Profiles are needed to make sure your video file will play fine on a certain decoder. For example a “Main” profile compliant video will play 100% fine on every “Main” profile capable decoder/player. When working with the x264 encoder, there are basically two profiles you have to take care of: the “Main” profile and the “High” profile. Nevertheless x264 is missing the Error Resilience feature from the “Baseline Profile” as well as the Interlacing Support from “Extended Profile”. If you want to play your video on software players, then you don't need to care about profiles that much. The H.264 decoder from “libavcodec”, which is used in MPlayer, VLC Player, ffdshow and many more, supports all of x264' features, including the “High” and “Predictive Lossless” profile features. Same for proprietary decoders, such as CoreAVC. Nevertheless if you are targeting a hardware player, then profiles are very important, as hardware players are very restrictive on what profile they support.
In addition to the profiles, the H.264/AVC specifications also define a number of levels. While profiles define which compression features of H.264 may (or may not) be used, the levels put further restrictions on other properties of the video. These restrictions include the maximum resolution, the maximum bitrate, the maximum framerate (for a given resolution) and the maximum number of reference frames (indirectly limited though MaxDPB). In order play your H.264 video on a specific hardware player, that player must not only support your videos profile, but also your video's level (or a higher one). Again software players usually don't have such restrictions, as long as you CPU is powerful enough.
Note: The common notation for Profiles and Levels is “Profile@Level”, for example High@4.1. Furthermore there is no way to directly encode your video to a specific level and/or profile. If you want your video to comply to a certain profile/level, you must choose the encoder settings accordingly. Presets may be helpful to find the correct settings. Anyway, it may still be necessary to resize your video and/or change the framerate.
List of all H.264/AVC Profiles
| | Baseline | Extended | Main | High | High 10 | High 4:2:2 | High 4:4:4 Predictive |
| I and P Slices | YES | YES | YES | YES | YES | YES | YES |
| B Slices | NO | YES | YES | YES | YES | YES | YES |
| SI and SP Slices | NO | YES | NO | NO | NO | NO | NO |
| Multiple Reference Frames | YES | YES | YES | YES | YES | YES | YES |
| In-Loop Deblocking Filter | YES | YES | YES | YES | YES | YES | YES |
| CAVLC Entropy Coding | YES | YES | YES | YES | YES | YES | YES |
| CABAC Entropy Coding | NO | NO | YES | YES | YES | YES | YES |
| Flexible Macroblock Ordering (FMO) | YES | YES | NO | NO | NO | NO | NO |
| Arbitrary Slice Ordering (ASO) | YES | YES | NO | NO | NO | NO | NO |
| Redundant Slices (RS) | YES | YES | NO | NO | NO | NO | NO |
| Data Partitioning | NO | YES | NO | NO | NO | NO | NO |
| Interlaced Coding (PicAFF, MBAFF) | NO | YES | YES | YES | YES | YES | YES |
| 4:2:0 Chroma Format | YES | YES | YES | YES | YES | YES | YES |
| Monochrome Video Format (4:0:0) | NO | NO | NO | YES | YES | YES | YES |
| 4:2:2 Chroma Format | NO | NO | NO | NO | NO | YES | YES |
| 4:4:4 Chroma Format | NO | NO | NO | NO | NO | NO | YES |
| 8 Bit Sample Depth | YES | YES | YES | YES | YES | YES | YES |
| 9 and 10 Bit Sample Depth | NO | NO | NO | NO | YES | YES | YES |
| 11 to 14 Bit Sample Depth | NO | NO | NO | NO | NO | NO | YES |
| 8×8 vs. 4×4 Transform Adaptivity | NO | NO | NO | YES | YES | YES | YES |
| Quantization Scaling Matrices | NO | NO | NO | YES | YES | YES | YES |
| Separate Cb and Cr QP control | NO | NO | NO | YES | YES | YES | YES |
| Separate Color Plane Coding | NO | NO | NO | NO | NO | NO | YES |
| Predictive Lossless Coding | NO | NO | NO | NO | NO | NO | YES |
| | Baseline | Extended | Main | High | High 10 | High 4:2:2 | High 4:4:4 Predictive |
From Wikipedia, the free encyclopedia
List of all H.264/AVC Levels
| Level number | Max macroblocks per second | Max frame size (macroblocks) | Max video bit rate (VCL) for Baseline, Extended and Main Profiles | Max video bit rate (VCL) for High Profile | Max video bit rate (VCL) for High 10 Profile | Max video bit rate (VCL) for High 4:2:2 and High 4:4:4 Predictive Profiles | Examples for high resolution @ frame rate (max stored frames) in Level |
| 1 | 1485 | 99 | 64(nbsp)kbit/s | 80(nbsp)kbit/s | 192(nbsp)kbit/s | 256(nbsp)kbit/s | 128×96@30.9(nbsp)(8) 176×144@15.0(nbsp)(4) |
| 1b | 1485 | 99 | 128(nbsp)kbit/s | 160(nbsp)kbit/s | 384(nbsp)kbit/s | 512(nbsp)kbit/s | 128×96@30.9(nbsp)(8) 176×144@15.0(nbsp)(4) |
| 1.1 | 3000 | 396 | 192(nbsp)kbit/s | 240(nbsp)kbit/s | 576(nbsp)kbit/s | 768(nbsp)kbit/s | 176×144@30.3(nbsp)(9) 320×240@10.0(nbsp)(3) 352×288@7.5(nbsp)(2) |
| 1.2 | 6000 | 396 | 384(nbsp)kbit/s | 480(nbsp)kbit/s | 1152(nbsp)kbit/s | 1536(nbsp)kbit/s | 320×240@20.0(nbsp)(7) 352×288@15.2(nbsp)(6) |
| 1.3 | 11880 | 396 | 768(nbsp)kbit/s | 960(nbsp)kbit/s | 2304(nbsp)kbit/s | 3072(nbsp)kbit/s | 320×240@36.0(nbsp)(7) 352×288@30.0(nbsp)(6) |
| 2 | 11880 | 396 | 2(nbsp)Mbit/s | 2.5(nbsp)Mbit/s | 6(nbsp)Mbit/s | 8(nbsp)Mbit/s | 320×240@36.0(nbsp)(7) 352×288@30.0(nbsp)(6) |
| 2.1 | 19800 | 792 | 4(nbsp)Mbit/s | 5(nbsp)Mbit/s | 12(nbsp)Mbit/s | 16(nbsp)Mbit/s | 352×480@30.0(nbsp)(7) 352×576@25.0(nbsp)(6) |
| 2.2 | 20250 | 1620 | 4(nbsp)Mbit/s | 5(nbsp)Mbit/s | 12(nbsp)Mbit/s | 16(nbsp)Mbit/s | 352×480@30.7(nbsp)(10) 352×576@25.6(nbsp)(7) 720×480@15.0(nbsp)(6) 720×576@12.5(nbsp)(5) |
| 3 | 40500 | 1620 | 10(nbsp)Mbit/s | 12.5(nbsp)Mbit/s | 30(nbsp)Mbit/s | 40(nbsp)Mbit/s | 352×480@61.4(nbsp)(12) 352×576@51.1(nbsp)(10) 720×480@30.0(nbsp)(6) 720×576@25.0(nbsp)(5) |
| 3.1 | 108000 | 3600 | 14(nbsp)Mbit/s | 14(nbsp)Mbit/s | 42(nbsp)Mbit/s | 56(nbsp)Mbit/s | 720×480@80.0(nbsp)(13) 720×576@66.7(nbsp)(11) 1280×720@30.0(nbsp)(5) |
| 3.2 | 216000 | 5120 | 20(nbsp)Mbit/s | 25(nbsp)Mbit/s | 60(nbsp)Mbit/s | 80(nbsp)Mbit/s | 1280×720@60.0(nbsp)(5) 1280×1024@42.2(nbsp)(4) |
| 4 | 245760 | 8192 | 20(nbsp)Mbit/s | 25(nbsp)Mbit/s | 60(nbsp)Mbit/s | 80(nbsp)Mbit/s | 1280×720@68.3(nbsp)(9) 1920×1080@30.1(nbsp)(4) 2048×1024@30.0(nbsp)(4) |
| 4.1 | 245760 | 8192 | 50(nbsp)Mbit/s | 62.5(nbsp)Mbit/s | 150(nbsp)Mbit/s | 200(nbsp)Mbit/s | 1280×720@68.3(nbsp)(9) 1920×1080@30.1(nbsp)(4) 2048×1024@30.0(nbsp)(4) |
| 4.2 | 522240 | 8704 | 50(nbsp)Mbit/s | 62.5(nbsp)Mbit/s | 150(nbsp)Mbit/s | 200(nbsp)Mbit/s | 1920×1080@64.0(nbsp)(4) 2048×1080@60.0(nbsp)(4) |
| 5 | 589824 | 22080 | 135(nbsp)Mbit/s | 168.75(nbsp)Mbit/s | 405(nbsp)Mbit/s | 540(nbsp)Mbit/s | 1920×1080@72.3 (13) 2048×1024@72.0 (13) 2048×1080@67.8 (12) 2560×1920@30.7 (5) 3680×1536@26.7(nbsp)(5) |
| 5.1 | 983040 | 36864 | 240(nbsp)Mbit/s | 300(nbsp)Mbit/s | 720(nbsp)Mbit/s | 960(nbsp)Mbit/s | 1920×1080@120.5 (16) 4096×2048@30.0 (5) 4096×2304@26.7 (5) |
| Level number | Max macroblocks per second | Max frame size (macroblocks) | Max video bit rate (VCL) for Baseline, Extended and Main Profiles | Max video bit rate (VCL) for High Profile | Max video bit rate (VCL) for High 10 Profile | Max video bit rate (VCL) for High 4:2:2 and High 4:4:4 Predictive Profiles | Examples for high resolution @ frame rate (max stored frames) in Level |
From Wikipedia, the free encyclopedia
For more detailed information, please refer to “Annex A” in the official ITU-T H.264 specifications!
GPU support
Since GPGPU has become a hot topic, people began asking for GPU support in Avidemux. These people need to understand that Avidemux cannot offer GPU support for H.264 encoding, until GPU support is implemented in the x264 library. There is a project scheduled to add CUDA support to x264 (see http://wiki.videolan.org/SoC_x264_2009#GPU_Motion_Estimation), but there are no results yet (May 2009). We know that there are commercial H.264 encoders with GPU support available already. But if you look at these encoders closely, you will notice that their speed-up claims are marketing blabber. These encoders may be fast, but their quality isn't anywhere near x264's quality! Also note that marketing people tend to compare their encoders to the completely unoptimized H.264 Reference Encoder. x264 is faster than the reference encoder by several orders of magnitude, which renders these speed comparisons meaningless. x264 can run extremely fast on a CPU and scales up to at least 16 cores. So don't believe everything that marketing people claim!
IDR-frames
IDR frames are: An IDR frame is what has been traditionally known as an I frame. An IDR frame, just like an I frame in MPEG-1/2 and MPEG-4 ASP, starts with a clean slate, and all subsequent frames will make reference to the IDR frame and subsequent frames. Non IDR I frames should be rare, but since they cannot be ruled out, enforcing a minimal IDR interval can help improve compression in some high motion scenes. In H.264/AVC you can also have I frames inside a GOP, which are not seekable, since the long time references introduced in H.264/AVC could result in a P frame after the I frame to reference a P frame before the I frame.
Max IDR-keyframe interval indicates the maximum distance between two IDR frames. Similarly, Min IDR-keyframe interval indicates the minimum distance between two IDR frames.
List of References
See also